Are you all ready to get started?
Did you get all your supplies gathered up? Are your fabrics all picked out?
If you’re just now finding this, we’re just getting started — You can get all the preliminary information for the Triangle Salad Quilt-Along right HERE, so jump right on in!
Today is our first tutorial for making triangle-squares, or half-square triangles, as they’re commonly called.
This first method is probably the most-used and easiest of all the methods I’ll be showing you, and you’ve most likely done it before, if you’ve been quilting for any length of time.
However, I’ll show you a couple different methods for doing it, give you the formula for making them any size you need, and give you a few pros and cons for using this method. So please read through the entire post before you begin.
Here we go!
The Basics:
For our purposes today, you will need one print fabric and your background fabric. Cut a square from each of these fabrics 4 7/8″.

On the back side of your background square, draw a diagonal line from corner to corner with a marking pencil.
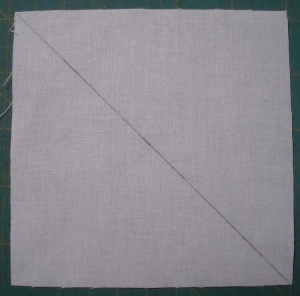
Match the two squares up, right sides together, and pin.

Next, you will stitch 1/4″ on each side of the drawn line. You can barely see my stitching here because it blends in so well, but you can click on the photo to see it larger.

For these units to be the most accurate, you will need to make sure that your seam is exactly 1/4″ when doing this. If you need to test your 1/4″ seam, read THIS POST for how to do that.
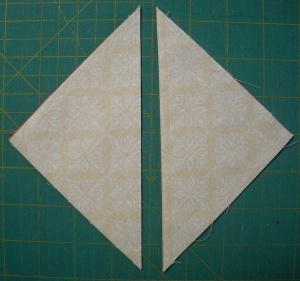
Once you’ve sewn on both sides of the line, cut ON the drawn line to cut them apart.

Press these units open, pressing the seams toward the darker fabric.

You will see these little points sticking out that are called “dog ears”. It’s best to trim those off for neater piecing.

These two units should each measure 4 1/2″ square. If your cutting and your seam allowance are both correct, they’ll come out just right.
A Different Method:
I’m going to show you another method that doesn’t require you to be quite as careful with your cutting and stitching. It adds a bit more time to the process, but makes the units very precise, in the event you’re worried that they aren’t coming out like they should.
This time we’ll use two different print fabrics.
Cut a square from each fabric 5″ x 5″.

On the back side of the lighter fabric, draw a diagonal line from corner to corner with a marking pencil.

Match the two squares up, right sides together, and pin.

Stitch 1/4″ on each side of the drawn line.

Cut ON the drawn line to separate them.
Before you press these open, I’d like to show you a little trick to speed things up some.
Since you started with your squares a bit larger than necessary, this gives you room to trim the units to the proper size once you’re done sewing, making absolutely sure that they are the exact size you need for your project.
We are aiming for perfect 4 1/2″-square units here today. If you were to press the units open before trimming, you might end up having to trim all four sides of the unit to get it exact.
But, in order to save some trimming time and effort, I like to trim mine before I press them open. That way, I only ever have to trim two sides. Then, when I press the units open, they’re good to go.
Here’s how to do it:
Lay the unopened unit on your cutting mat, positioned as shown (if you’re right-handed — opposite direction if you’re left-handed):

Line up the 4 1/2″ mark at the top of the ruler with the sewn line at the top of the triangle unit.
Line up the 4 1/2″ mark on the side of the ruler with the sewn line on the opposite corner of the triangle unit.
The 4 1/2″ marks on both sides of the ruler should be lined up with the stitching line on your sewn unit. (You can click the photo to see this larger.)

Hold the ruler very steady, and trim both the edges that are sticking out. It’s just a sliver that gets trimmed off, but it makes the unit very accurate.

Now you can press the unit open, and it should be the perfect size!

You’ll still need to trim off those dog ears, don’t forget.

One More Trick:
Here’s one more trick you can use with this method, when sewing your 1/4″ seams, as long as you’re working with smaller units (this doesn’t work quite as well with large ones on my machine). However, if you have a large bed area for your sewing machine (or if it’s sunken into a tabletop) you can do larger units, so feel free to experiment with your own personal setup.
This method saves you the time and trouble of drawing a line on the back side of the squares. Place a piece of painter’s tape on the bed of your sewing machine, lined up exactly 1/4″ off to the right side of your needle.

I’m demonstrating with some smaller squares here, just to show you what I mean.
When placing your pinned unit for stitching, line up the bottom point with the edge of the tape, and make sure it stays straight along that tape line as you feed the unit through the machine.

Repeat on the other side of the line, and you’ve saved yourself the trouble of having to draw a lot of lines on your fabric squares.
Formula for making these any size you need:
To make these squares any size you need for your project, there’s a very simple formula. Simply take the size of the finished unit you desire, and add 7/8″ to it.
For example, the ones we made above are to finish in the quilt at 4″ square, so I had you cut the squares 4 7/8″.
If you want your units to finish at 2″, you’d cut the squares 2 7/8″.
If you want units that finish at 2 1/2″, you’d cut the squares 3 3/8″.
Make sense?
If you’re using Method 2 above, you can round those numbers up, and then have that little bit of room to trim them down.
For example, if you want your units to finish at 2″, cut your squares 3″.
And we cut 5″ squares to trim ours down to 4 1/2″ so that they will finish at 4″.
Advantages of using this method:
There are times when this method is the best and easiest method to use for your chosen project.
- If you need a greater variety of fabrics, you can mix and match your prints a lot more, since this method only makes two identical units each time. Then you don’t end up with as many alike.
- If you only need a few units, this method is fast, and doesn’t require any special papers or tools.
- If you already have a bunch of squares cut in a size you can use for these units, it’s very handy to just pick those up and use them, rather than cutting more.
Disadvantages of using this method:
There are also times when one of the other methods might work better for your project.
- If you need a whole bunch of identical units.
- If you don’t want to draw lines on the back of all those background squares.
- If you don’t want to trim every single unit.
For the Quilt-Along:
If you’re going to make the Triangle Salad quilt, you’ll need to repeat the above process several times to get the ones you need. This will give you an opportunity to try both methods to see which you like better, and give you practice in making lots of the units!
All the units we’re making this time need to measure 4 1/2″ (unfinished), to finish at 4″ in the quilt, which means you can use the measurements I provided above in the actual tutorial.
You will need to make 8 units using a print fabric with the background fabric.
You will need to make 26 units using two print fabrics together.
Have fun making all your units this week, and I’ll be back next Monday with Tutorial #2!
Read Full Post »