For the Canning Season quilt, we’re gonna need a lot of half-square triangles. And I do mean a LOT!
But don’t let that deter you. If you stick with it, you’ll have a great quilt, and all that work will be worth it in the end!
I’m not going to have you cut all your pieces for the entire quilt at once, because that would probably be all you’d get done this week. Plus, I want you to be able to make a sample block section, and see if you like your color choices, etc., before you go any further.
Before we get started with any of that, however, Linda and Norma helped me get some better pictures of my quilt top, so you can see the quilt lots better. Here’s the full top:

And a close-up:

Do these help you a bit more? There’s no tree shadow to mess with your eyes!
I also thought I’d include a shot of all the fabrics I used in my quilt. This is the Vintage Kitchen line by Andrea Muller for Riley Blake Designs. My background is also a Riley Blake print, an off-white with a barely discernible polka dot in it.

Please read through all of the information below before beginning, because I’m presenting lots of options, and you’ll want to consider all those options before you start. And please, if you have any questions at all, simply leave me a comment, or email me, and I’ll be more than happy to answer them. I don’t want any confusion or frustration, or missing parts or pieces, so definitely ask for clarification if and when you need it!
I realize that you all probably have lots of various sizes of scraps that you want to work with, so for making your triangle squares, you have lots of options, and you can choose the method you like the best, or the method that works the best for the size of scraps you have.
So check out the links below for all the various tutorials on making your half-square triangles. For purposes of today’s Section Tutorial, you’ll need 7 triangle-square units, each measuring 2 1/2″ to finish at 2″ in your quilt. You can make them all alike, or you can make each one different if you want a really scrappy look to your quilt.
Each tutorial gives instructions for various sizes, with a formula for making them the size you need. When cutting for your particular method, pay close attention to the size you need to cut to achieve the 2″ finished units you need for the Canning Season quilt.
Tutorial #1: Using two squares to make two units alike. (My personal favorite for getting a great variety.)
Tutorial #2: Make 8 at a time using larger squares.
Tutorial #3: Use Star Singles papers.
Tutorial #4: Use Thangles papers. This method will work great for the Canning Season quilt if you are using a jelly roll or want to use up other 2 1/2″ strips.
Tutorial #5: Use Triangles on a Roll paper.
You may find that you want to use several of these methods, depending on the size of scraps you want to use up. For my quilt, I used Tutorial #1, and cut my squares larger so that they could be trimmed down.
I cut 3″ squares, then trimmed the triangle-square units to 2 1/2″ unfinished. Since we’re sewing a lot of these units together, accuracy helps a lot with getting so many small units to line up correctly in our finished section.
I’ve had a couple of other questions from participants, too, and the answers I gave them might help you out, so here are a couple more options.
• If you have leftover half-square triangle units from another quilt, feel free to use them for this quilt. I mean, why not? They’re already made! If they’re not the correct size, simply trim them down to 2 1/2″ unfinished. Then all you’ll have to do is cut the background pieces and follow the Section Tutorial to put them together. A head start!
• If you have leftover half-square triangle units from another project that are too small, and you want to use them anyway, that’s perfectly fine, too. You can certainly use them, you’ll just have to make adjustments to the section as necessary to get everything to fit, and keep in mind that your blocks will be smaller, so therefore, your quilt will be smaller, or you will have to make extra blocks to make the quilt bigger. The choice is yours. I’ll provide an example below for further clarification on how to do this, so read on.
• If you do not want to purchase 6 1/2 yards of background fabric, and want your background to be scrappy, too, that is a fabulous idea! I’m all about using up the stash and the scraps. Try to choose fabrics that read at about the same level of color — a grouping of creams and light tans, for example, or a bunch of great low-volume prints. See the color examples I was playing around with below.
OK . . . once you have some half-square triangle units made, we’re ready to go on with the section!
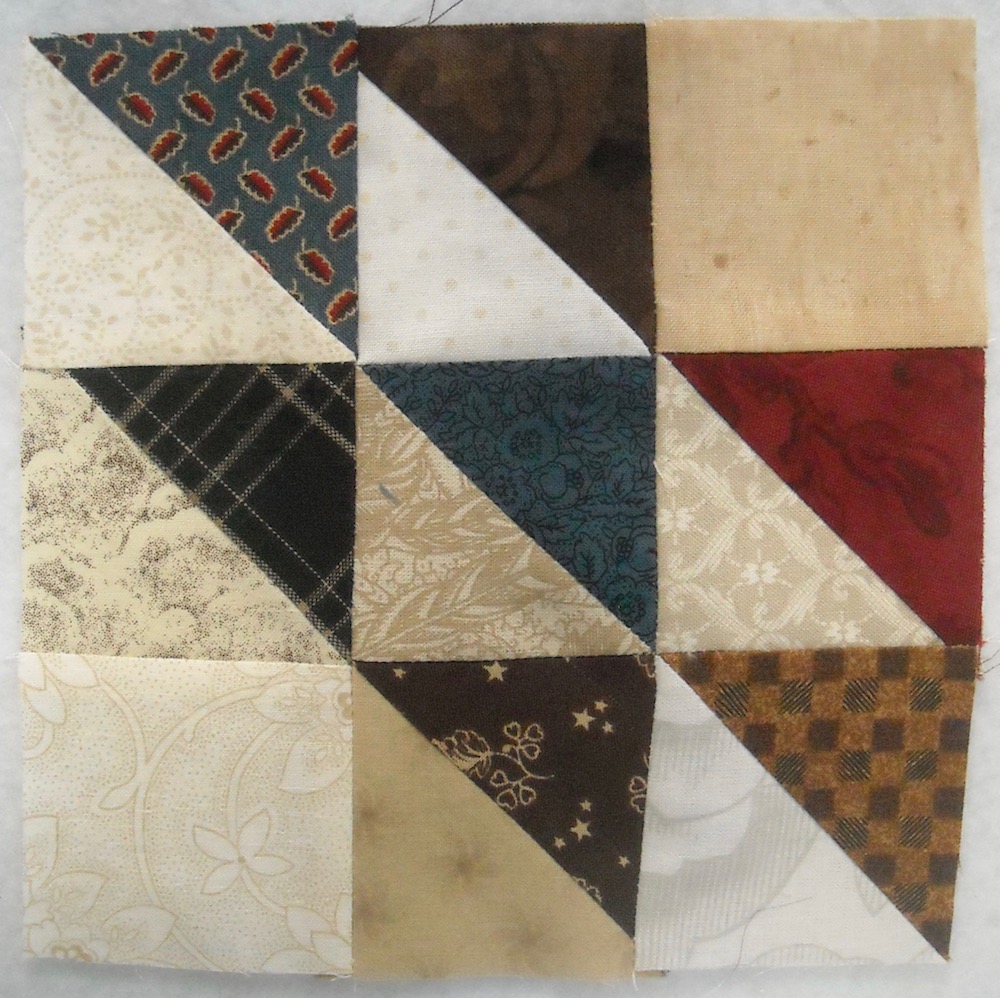
Choose the 7 half-square triangle units you want to use for your section. You can mix them all up:

Or you can make them all alike (which is what I ended up doing):

Here are a couple of other color suggestions for using up scraps. A more traditional look, using creams and light tans for background:
A modern scrappy look using low-volume prints for the background with bright colors:

Or a dark background with pops of bright color! (I’d love to see one done this way.)

Also, don’t forget that if you want to go really planned, you can refer to the mockup in the Introductory post to see what it would look like done in only two colors with your chosen background.
In addition to your chosen 7 half-square triangle units, you will need 2 squares of background fabric that measure 2 1/2″ square, the same size as your unfinished HST units.
Lay these 9 pieces out as shown, making sure you get your HST units all turned correctly:
We’ll assemble these like a simple 9-patch block. Sew the units together into rows, being careful not to turn them the wrong direction while you’re sewing:

You can press the seams however you prefer. I pressed mine to the right in the top and bottom rows, and to the left in the middle row, so I could nest my seams. If you find that this is too much bulk, you can press seams open to alleviate that somewhat. As we get further along, they end up not nesting well, anyway, because of the orientation of the sections, so open seams might work better, if you feel that you have trouble lining things up.
Sew the rows together to complete the section, again pressing seams however you prefer:

That completes a section! The section should measure 6 1/2″ x 6 1/2″ unfinished.
So your job this week is to make 1000 half-square triangle units! Yes, you’re reading that correctly.
You will actually only need 994, but seriously, just go ahead and make the extra 6, so you’ll have a few to play around with. You’re not gonna notice that little bit extra, I promise!
You will need a total of 284 of the 2 1/2″ background squares as well. So once you’re comfortable with your fabric choices, and you’ve made a sample section to see if everything goes together right, feel free to go ahead and cut those when you’re ready.
You will need a total of 142 of the block sections made from this tutorial to complete the Canning Season quilt as shown. I don’t expect you to get this done in just one week, so don’t panic! That’s why I’ve left a 2-week gap in the schedule after next week’s tutorial. I don’t want you to feel too rushed, and the instructions will remain here indefinitely, so please work at your own pace. Also, if this is simply too daunting a task for you to imagine, you can certainly make your quilt smaller. But honestly, I think you will be glad you did the work once you get this quilt finished.
NOTE: If you decide to make a two-color version of the quilt as shown in the diagram in this post, you will need 80 of your block sections to be from one color (red in the diagram), and 62 of your block sections to be in the other color (yellow in the diagram).
 As promised above, here’s an example of the section being made with smaller units. I’m showing the smaller one here compared to the bigger one. The units in this sample (the bottom block) each measure 2″ unfinished. Therefore, you’d need to also cut your background squares to 2″ square to make them fit. The section is assembled in the same manner as above, it just comes out smaller. This one measures 5″ x 5″ unfinished, and will finish in the quilt at 4 1/2″ square. If you love working with smaller pieces, give it a try!
To state that another way: Whatever size your unfinished half-square triangles are, that’s the size you need to cut your two background squares as well.
OK, you have your work cut out for you for the next few weeks. I’ll be back with the next tutorial on Monday, February 13th, but don’t think that you have to have everything all done by then. I’m simply providing it so that those who are ready can move on. Then I’m giving you a 2-week break to sew your little hearts out before we go any further. So get to sewing, and I’ll see you next Monday!
And don’t forget, if you have ANY questions at all, please do not hesitate to ask. I’ll be here.


Thank you. Looking forward to this!
Love! I just told 5000 of my closest friends about the quiltalong.
Wow. Gorgeous quilt! Appreciate the varied tutorials too.
OK, you have your work CUT out for you for the next few weeks. ——REALLY? YOU ARE THE PUNSTER! ——It’s beautiful.
Ok, I am READY! I have everything picked out and have started sewing away. This is just what I needed to get me back at the sewing machine. Thanks, Shelly!