Feeds:
Posts
Comments

Archive for the ‘Quilt-Along’ Category

A few months ago, I finished my Vintage Melons quilt top. Almost three months ago, to be exact, and I’ve been meaning to post this update ever since, but could never seem to make myself sit down long enough!

I had a tough time deciding on a layout, and finally decided on a layout that looked like large flowers on big stems full of leaves. And it turned out so gigantic that I can’t even get good photos to show you what that actually looks like!

There were so many repeats of a few of the vintage melon prints that I decided to group them and turn them into large flowers. Then I appliquéd centers on them.

Then I made various groupings of leaves to look like the flowers were on stems, and added sashing in between all the groupings.

I came dangerously close to making this a very ugly quilt! It did turn out a bit better than I first thought it did.

It measures around 107 inches wide by 105 inches long. I will get it quilted up one of these days and re-measure it to make sure. Hopefully, at that time, I will also get some better photos of it to show you.

I DO love how happy and bright it is.

Meanwhile, I’m happy to have those vintage melon pieces made into a quilt top. One step closer to salvaging some unused pieces that another quilter had obviously intended to do something with.

Maybe they gave up on it because they thought it was gonna be too ugly?

I always say, “There’s no such thing as an ugly quilt.” And this will still be a snuggly item once I’m finished, even if it isn’t a show stopper! It at least deserves that.

Read Full Post »

Fancy Farm Girl

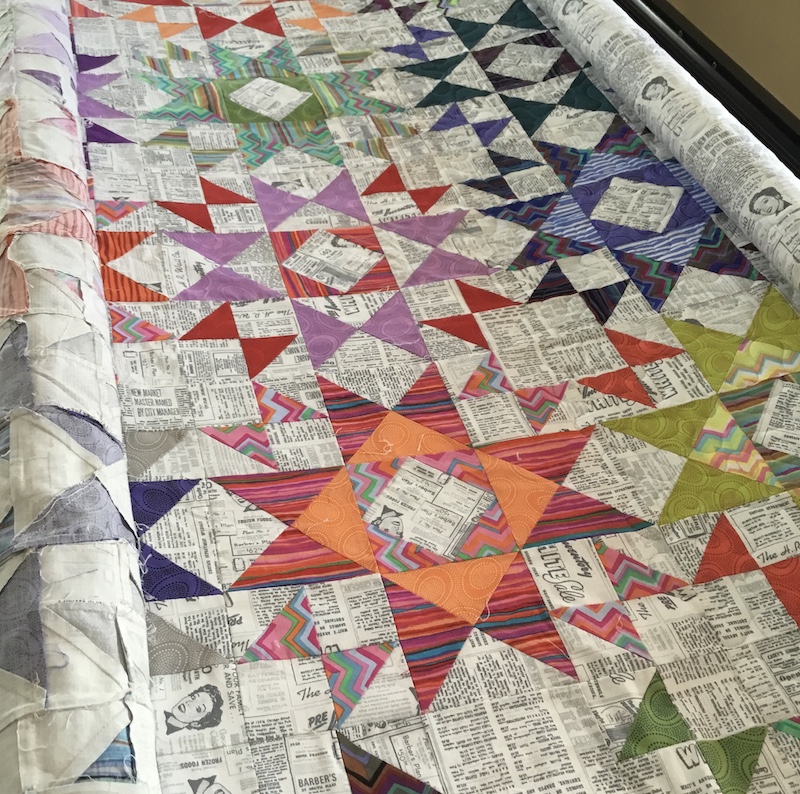
One of my all-time favorite quilts I’ve ever made is my Fancy Farm Girl quilt.

The pattern can be found in my book, A Simple Life, which is now out of print. However, it IS still available in the e-book version, which you can purchase HERE.

If you already own the book, then you have this pattern! Please be aware, however, that there is a correction to this pattern in the book, which you can find HERE.

Or you can buy just the block pattern in my Etsy shop. It’s the Month 9 PDF pattern of the Hazel’s Diary quilt. (More info HERE.)

Even after all these years, I’m still so in love with this quilt. I made mine out of all scraps that had a retro 50s feel about them (some of the fabrics actually WERE from the 50s), and for the background, I used the newsprint print from Zen Chic’s Modern Background Paper fabric line by Moda. I bought nearly an entire bolt of it, I loved it so much. I used it for the background of the blocks, and then used it for the backing on my quilt!

My sister made a version of the quilt, too. While she used the same background as I did, all of her block fabrics are Kaffe Fassett prints that she had collected over the years. She also must have purchased an entire bolt of the newsprint print, because that’s also what’s on the back side of her Fancy Farm Girl quilt! You, too, could buy an entire bolt of that fabric, as it is now a Moda basic, and is still available!

The quilts are so busy that I quilted them both with a simple all-over meander. Nothing really shows up, so it wasn’t worth a highly custom quilting job.

This block was chosen because of, and this quilt was inspired by, my mother’s cousin, Peggy Rector, and this photo I found of Peggy being an actual Fancy Farm Girl!

I’ve been sorely tempted to make another version of this quilt, and someday I might. Or if I could talk any of you into making one of your own, and showing it to me, then I could just live vicariously through you while I keep working through my current backlog of UFOs!

Read Full Post »

Hello! Are you surprised to hear from me? It’s been awhile.

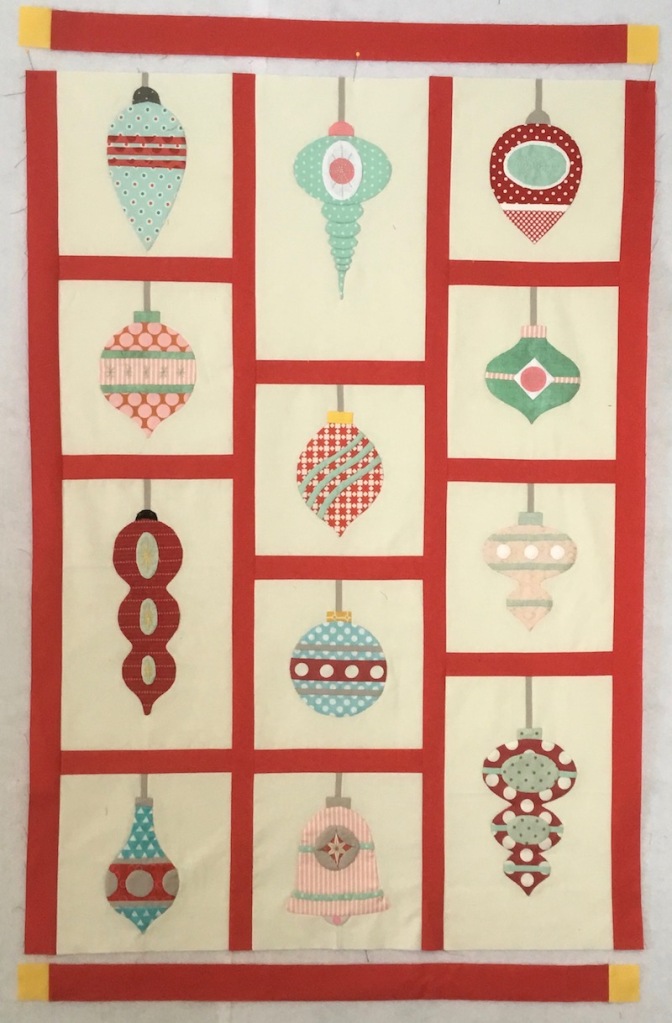
I’m finally back to post the finishing instructions for the Vintage Christmas Ornaments Wall Quilt. This is the setting version I’m talking about:

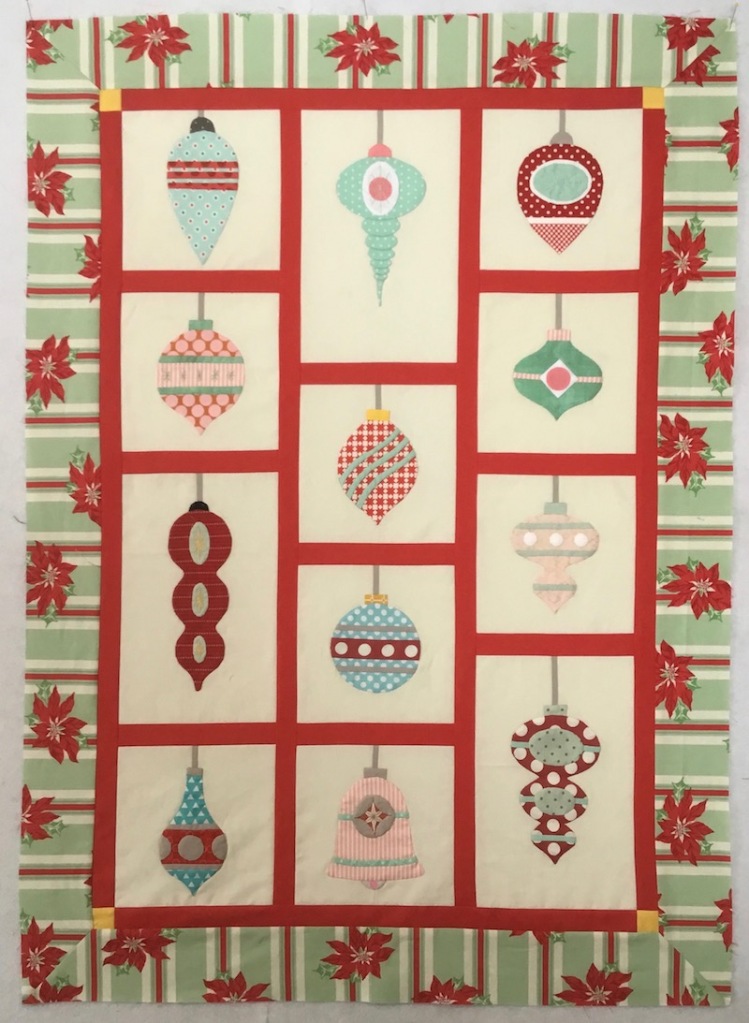
The sashing has changed a tiny bit from the original layout drawing. I opted for keeping it simpler because it ended up looking cleaner. This change also makes it possible for you to arrange your blocks differently than I did mine, giving you a bit more freedom with your arrangement, if you need it. Here’s my finished quilt!

Hopefully, after all this time, I’ve given you enough time to finish appliquéing all your ornaments! Don’t forget to trim all your finished blocks to size.

We’ll start with the cutting instructions for the sashing.

From the solid red, you will need to cut the following strips:

(4) 1 1/2″ x 35 1/2″

(2) 1 1/2″ x 23 1/2″

(9) 1 1/2″ x 7 1//2″

(4) 2 1/4″ x WOF for the binding

From the solid yellow, for cornerposts, cut:

(4) 1 1/2″ squares

For the outer borders, determine if your fabric is directional or if the direction makes no difference. If your fabric is directional, you will need to cut your borders so that everything is pointing the right direction, so be sure to figure that out before you cut. If direction doesn’t matter, you can cut all four of the outer border strips from the width or the length of the fabric, whichever works best for your particular fabric. For example, I used a stripe for my border, and I wanted the stripes to be running the same direction from each side (see the photo), so I was able to cut them all from the width of the fabric.

In addition, if you wish to miter the corners, add an additional 8″ to the length of each of your strips.

For the sides of the quilt, cut:

(2) 3 1/2″ x 37 1/2″ (45 1/2″ if mitering)

For the top and bottom of the quilt, cut:

(2) 3 1/2″ x 31 1/2″ (39 1/2″ if mitering)

OK, now that you have everything cut, you first need to determine how you will be arranging your blocks. Here’s the layout I chose for mine. You can arrange yours to suit your own preference.

Now it’s time to attach the short sashing strips. Sew one to the bottom of each block except for the bottom block in each column. Press the seams toward the sashing strips. Then sew all the blocks in each column together (like the one shown in the middle and on the right).

Next, add the vertical sashing strips. Sew one to each side of the center column of blocks. Sew one to the outer edge of the left and right columns, as shown.

Now you can sew all the columns together. Sew a yellow cornerpost square to each end of each of the two remaining sashing strips. Then sew these to the top and bottom of the quilt.

And finally, it’s time to add the outer borders. First sew on the side borders, then add the top and bottom borders, pressing seams toward the borders.

If you have chosen to miter your borders, and need help with that, there is a tutorial HERE that explains exactly how to do that.

And with that, you’re all finished with the top! Next up is the quilting. I custom quilted mine, I did minimal outlining of the ornaments, and chose a different background fill for each block. I did straight lines in the outer borders to line up with the stripes in my fabric.

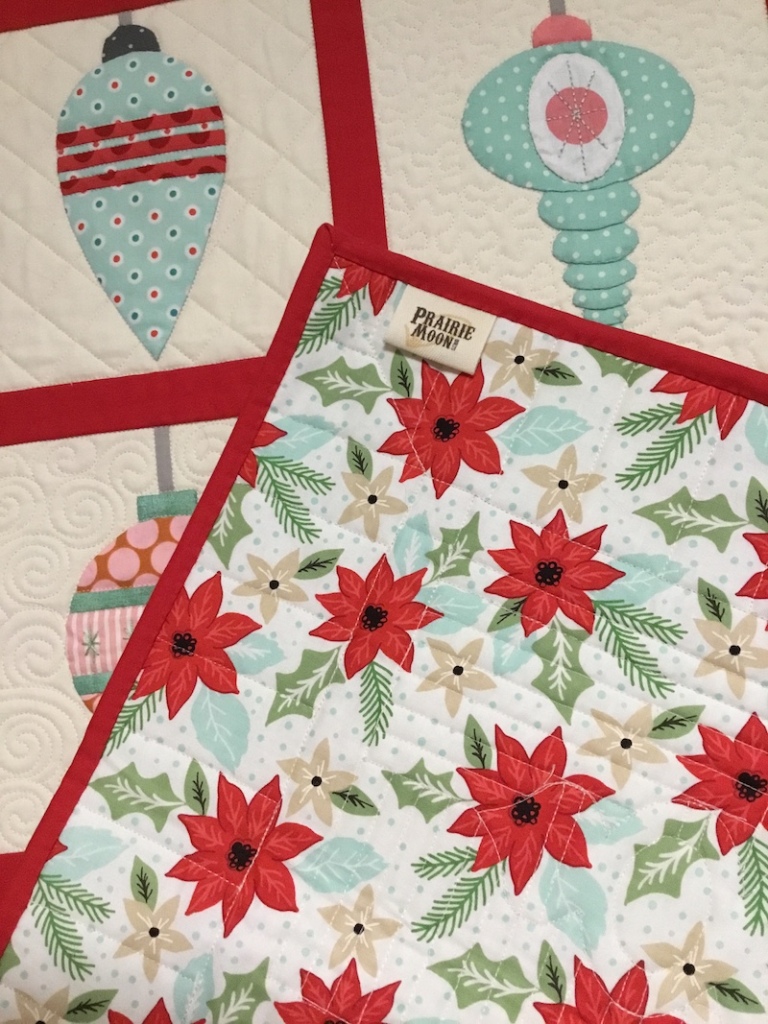
I chose this related piece for my backing:

And finally, you can bind your little quilt! I used the same solid red as my sashing to tie everything together, but you can do as you please with yours. There’s a binding tutorial HERE if you need it.

And that’s it! All done, and ready to decorate with it for Christmas 2022!

I’m still working on instructions for the other two versions. I still need to post the designs for the hanging strings for the embroidered ornaments. I haven’t forgotten, I just have been short on time; but I hope to get all of this wrapped up before long. Then maybe I can start another new quilt-along! It’s about time, right?

Read Full Post »

Welcome Back!

I’ve been gone way too long!

Things just get crazy busy, and then something has to give, and for some reason, this poor blog seems to get chosen for the back burner a lot.

But I broke my elbow back in September, and it has made me realize I need to slow down, so that’s what I’m doing, and that should give me more time to devote to posting things here again. After all, I have a Christmas quilt-along to wrap up, and there have always been so many other things planned that I haven’t gotten around to yet.

So I plan to start posting things here again, starting with the finishing instructions for the Vintage Christmas Ornament quilts. I have the wall quilt version finished, and I’ll be posting the finishing instructions for it in a few days.

I’m also still working on the hanging string instructions for the stitchery version, so those will be coming along soon as well. I want to get them wrapped up, so we can start another quilt-along — hopefully one I can keep up with and plan better for. More info on that after we get the Christmas one finished!

I have some quilts made by other people that I’d like to feature so you can see them, and as usual, lots of other things waiting in the wings.

So I hope you’ll stay tuned and check back in. Sorry to have dropped the ball for so long.

Read Full Post »

If you’re just joining in on The Vintage Christmas Ornaments Quilt-Along, you can click HERE to get started. All the related links are also in the sidebar to the right.

It’s Ornament #12! The final ornament in the set. Our collection is complete. And if I do say so myself, I love them all!

Here’s the embroidery version:

Once again, I’ve explained the stitches and colors I used in the pattern, but it’s only a guideline. Please feel free to do your own thing! There are links in the sidebar to my favorite sites for embroidery stitch instructions (under Favorite Links).

Here’s my appliqué version for the throw quilt option:

Of course, more rickrack! I managed to find a proper rickrack to use on every one of my ornaments, which makes me happy no end! (It’s the little things.)

Also, please note that I fussy cut my center dot from a polka dot print. It kept me from having to appliqué an actual circle that size, and just added a little extra in a simple way.

Here’s my appliqué version for the wall quilt option:

I used fabric strips for the stripes on this one, and once again, I fussy cut the center dot from a polka dot print — a large dot this time.

You could also use any type of embellishment for that center dot, such as a button or charm.

Have fun making them all your own!

The pattern is available as a PDF instant download in Hazel’s Mercantile for $1.75. The pattern has all the instructions for all the versions of the ornament shown above, along with full-size templates, piecing instructions, appliqué tips, the embroidery stitch chart with colors, placement information, and anything else I could think of to include. It’s ready for download, so you can get started right away!

That was our final ornament! I’ve been a long time getting all of them finished and out there (longer than I intended, but hopefully worth it.)

I’ll be back with designs for the hanging strings on the embroidered version, so check back for those. It’ll be a free download.

There’s also a free bonus pattern coming out very soon, that can be used as a stand-alone pattern, or used in the throw quilt version of our quilt-along.

Finishing instructions for all the versions are next. You can choose whichever version you wish to finish out your Vintage Christmas Ornaments project. You can see all the various setting options and possible layouts HERE.

As usual, if you have any questions, don’t hesitate to contact me and ask. I’ll be happy to answer. Happy Stitching!

Read Full Post »

If you’re just joining in on The Vintage Christmas Ornaments Quilt-Along, you can click HERE to get started. All the related links are also in the sidebar to the right.

It’s time for Ornament #11. Past time, really — I’m having trouble keeping up!

Here’s the embroidery version:

Once again, I’ve explained the stitches and colors I used in the pattern, but it’s only a guideline. Please feel free to do your own thing!

The filler I used on this one is called Seed Stitch, but it’s also known as Rice Stitch, if you need to look it up.

You may also notice that I used a different treatment for that top center section on each ornament this time. Cos have I ever mentioned that I like lots of options???

My embroidered version has sparkles embroidered on, the throw quilt has a piece of grosgrain ribbon used to make an extra stripe, and my wall quilt version has polka dots appliquéd on.

Here’s my appliqué version for the throw quilt option:

I found some fancy rickrack to use on this one! All the rickrack I’ve used in all these ornaments is vintage rickrack that came from my grandmother’s stash of trims. I’m honored to use it on this quilt, and it’s been fun matching all the colors and pieces up with the various ornaments.

Here’s my appliqué version for the wall quilt option:

No embroidery on this one, and I used bias strips for the stripes.

Have fun making them all your own!

The pattern is available as a PDF instant download in Hazel’s Mercantile for $1.75. The pattern has all the instructions for all the versions of the ornament shown above, along with full-size templates, piecing instructions, appliqué tips, the embroidery stitch chart with colors, placement information, and anything else I could think of to include. It’s ready for download, so you can get started right away!

Only one more ornament to go! And then there’s a bonus pattern coming out, that can be used as a stand-alone pattern, or used in one of the options for the quilt-along. We’re about to wrap this up!

I was pretty late with Ornament #11, so Ornament #12 is coming out in just a few days. I need to get caught up.

As usual, if you have any questions, don’t hesitate to contact me and ask. I’ll be happy to answer. Happy Stitching!

Read Full Post »

If you’re just joining in on The Vintage Christmas Ornaments Quilt-Along, you can click HERE to get started. All the related links are also in the sidebar to the right.

We’re up to Ornament #10!

Here’s the embroidery version:

As always, I’ve explained the stitches and colors I used in the pattern, but it’s only a guideline. Please feel free to do your own thing! If you don’t like to do French Knots, choose another filler stitch that you like better.

Here’s my appliqué version for the throw quilt option:

Still going with my rickrack theme! And I put a little bit of embroidery embellishment on this one, too. This ornament is easier than it looks.

Here’s my appliqué version for the wall quilt option:

I left the embroidery embellishment off this one; the choice is yours.

Have fun making them all your own!

The pattern is available as a PDF instant download in Hazel’s Mercantile for $1.75. The pattern has all the instructions for all the versions of the ornament shown above, along with full-size templates, piecing instructions, appliqué tips, the embroidery stitch chart with colors, placement information, and anything else I could think of to include. It’s ready for download, so you can get started right away!

There are only two more ornaments to go! Here are some photos of what my groups of ornaments look like at this point. Yours may look different according to where you’re placing your ornaments, so don’t worry if they don’t look alike.

Here’s my embroidery version, which I will be turning into a wall quilt, with the possibility of using it as a bench pillow as well, when I’m finished.

Here’s my throw quilt version that I’m using all the rickrack on:

And here’s the blocks for my wall quilt version. The arrangement of blocks is not definite yet. I’m waiting until I have them all done to lay them out in their final spots. I don’t even have them all trimmed to size yet. I just threw them all up on the wall to get a picture of them all together for now:

Did you know? . . .

You can do the wall quilt version using the embroidered blocks? Just embroider each ornament individually onto a background square instead of all onto one large background.

You can also reduce or enlarge the size of the templates for any of the ornaments to use on other projects. My friend, René, reduced the size of one of the designs, and is using it on a napkin:

Photo stolen from René

You could reduce the size and embroider or appliqué several along the bottom edge of an apron. Or make a set of Christmas tea towels. There are so many different ways you can use these patterns!

As usual, if you have any questions, don’t hesitate to contact me and ask. I’ll be happy to answer!

Ornament #11 comes out on October 27. We might just get done in time for Christmas!

Read Full Post »

Let’s get this rolling again, shall we?

If you’re just joining in on The Vintage Christmas Ornaments Quilt-Along, you can click HERE to get started. All the related links are also in the sidebar to the right.

So onward with Ornament #9!

Here’s the embroidery version:

The embroidery on this one is really simple. As always, I’ve explained the stitches and colors I used in the pattern, but it’s only a guideline. Please feel free to do your own thing!

Here’s my appliqué version for the throw quilt option:

Keeping on with my rickrack theme! This one is also really simple this time.

Here’s my appliqué version for the wall quilt option:

This ornament is another one in which you can either piece the body to create the stripes, or make it all appliqué; the choice is yours. Both methods are given, and you can choose the one you think is easiest for you.

Have fun making them all your own!

The pattern is available as a PDF instant download in Hazel’s Mercantile for $1.75. The pattern has all the instructions for all the versions of the ornament shown above, along with full-size templates, piecing instructions, appliqué tips, the embroidery stitch chart with colors, placement information, and anything else I could think of to include. It’s ready for download, so you can get started right away!

As usual, if you have any questions, don’t hesitate to contact me and ask. I’ll be happy to answer!

Ornament #10 comes out on October 13.

Happy Stitching!

Read Full Post »

Vintage Christmas Ornament #8

Whew! I’m only four days late with Ornament #8. Evidently, I failed to look at my own calendar when I scheduled this one!  But here we are, so hopefully, no harm done. There are only 4 ornaments left! Then we get to start putting things together into finished projects — I’m excited to see this come together.

If you’re just joining in on The Vintage Christmas Ornaments Quilt-Along, you can click HERE to get started. All the related links are also in the sidebar to the right.

So onward with Ornament #8!

Here’s the embroidery version:

I felt like I needed some more red in mine, since it IS my favorite color. Again, I’ve explained the stitches and colors I used where in the pattern, but it’s only a guideline. I did those middle circles with chain stitch. You may not like chain stitch, so please feel free to do your own thing!

Here’s my appliqué version for the throw quilt option:

Using rick rack for my stripes again! I’m really having fun with the rick rack.

Here’s my appliqué version for the wall quilt option:

This ornament is another one in which you can either piece the body to create the stripes, or make it all appliqué; the choice is yours. Both methods are given, and you can choose the one you think is easiest for you.

Have fun making them all your own!

The pattern is available as a PDF instant download in Hazel’s Mercantile for $1.75. The pattern has all the instructions for all the versions of the ornament shown above, along with full-size templates, piecing instructions, appliqué tips, the embroidery stitch chart with colors, placement information, and anything else I could think of to include. It’s ready for download, so you can get started right away!

As usual, if you have any questions, don’t hesitate to contact me and ask. I’ll be happy to answer!

Ornament #9 comes out on September 20th.

Happy Stitching!

Read Full Post »

Let’s get this show back on the road, shall we? I’m sorry I dropped off the map for awhile. I had several large deadlines looming all at once (one of which was these quilts and writing the pattern for them), and I had to concentrate on those. This has really been nagging at me, too — I’m anxious to see my projects finished! And you probably are, too.

I’ve updated the schedule HERE for the remainder of the quilt-along, and I’m seriously hoping nothing else derails me. We need to be done in time for Christmas, don’t we? What this means is that the ornaments will be coming out a bit closer together from now till the end, instead of the three-week gaps I started with.

If you’re just joining in on The Vintage Christmas Ornaments Quilt-Along, you can click HERE to get started. All the related links are also in the sidebar to the right.

So here we go with Ornament #7!

Here’s the embroidery version:

Very soft colors this time. As usual, I show you what stitches and colors I used where in the pattern, but it’s only a guideline. Feel free to do your own thing!

Here’s my appliqué version for the throw quilt option:

I used a bold print and fussy cut my ornament body from it, and in keeping with my rick rack theme, I used rick rack for my stripes. With the fabric doing all the work for me, I didn’t need to add the embroidery embellishment to this one!

Here’s my appliqué version for the wall quilt option:

This ornament is another one in which you can either piece the body, or make it all appliqué; the choice is yours. Both methods are given, and you can choose the one you think is better for your situation.

Have fun making them all your own!

The pattern is available as a PDF instant download in Hazel’s Mercantile for $1.75. The pattern has all the instructions for all the versions of the ornament shown above, along with full-size templates, piecing instructions, appliqué tips, the embroidery stitch chart with colors, placement information, and anything else I could think of to include. It’s ready for download, so you can get started right away!

As usual, if you have any questions, don’t hesitate to contact me and ask. I’ll be happy to answer!

Ornament #8 comes out on September 10th.

Happy Stitching!

Read Full Post »

Older Posts »