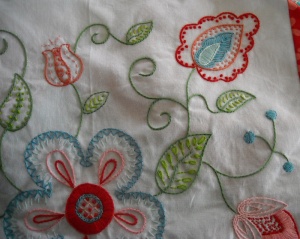
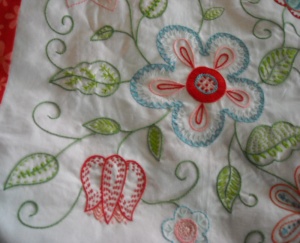
Can you believe it? Finally! I’m here with Block 4. Hopefully, this means I’m back on track and we can finish this!
For my plain version this time, I reduced the block size by half, to make a 6″ finished embroidery block. You’ll see why when I post the bonus project a bit later. I still used just one color of thread, but since it was smaller, I only used 2 strands of floss (and I think 1 skein will be enough). If you’re doing it full-sized, you will probably want to use three strands of floss, and may need two skeins. I still used only two stitches: Outline Stitch and French Knots (see links below for help with these stitches). It’s actually black thread on a white background, but the lighting in this house is horrible when I go to take pictures for some reason, so I couldn’t get it to show up right.
For the fancy version, again I used 8 thread colors, matched to the fabrics I’m making my quilt out of. You’ll need at least 1 skein of each color and possibly more of the greens for this block. I used three strands for this block as well.
This time, I’m showing some close-up photos of each section, so that hopefully, you can see the stitches a bit better, in spite of the fact that I’m such a horrible photographer.
Stitches that I used in the fancy block are as follows:
If you click on the name of each stitch, it links to a post or video on how to do that particular stitch, just in case you need to refer to them.
And always remember, you do not have to use the same stitches and fills that I did. Shop around on those stitch sites, pick something new and unusual to try, but no matter what, do what you feel comfortable with.
On the printed pattern, you will see black lines and red lines, just like every time. If you’re doing the plain version, you’ll only need the black lines.
If you’re doing the fancy version, you may also need some of the red lines. It’s possible that you won’t need to actually trace the red lines, but just refer to them for placement as you’re doing your fills. It’s up to you and how comfortable you feel sewing without the lines.
Here’s the download: Hazel’s Summer Wildflowers, Block 4
For more information, you can refer back to the post for Block 1 for links to how to trace off your block pattern onto the fabric or for the embroidery lesson sites.
And I’ll be back later with the bonus project for Block 4. Thanks to everyone for waiting so patiently for me to finally get my act back together. Enjoy! Oh, and send me pictures . . .


I guess this means that I should get busy and finish block 3. I try not to get so far ahead that I am impatient!! LOL
Your block is beautiful!
Hi! I love your wildflower stitch along. I was wondering when the pieced blocks of this quilt will be published? I read there will be 6 embroidered blocks and we came to block 4 so far. Do I need to donwload others free patterns here like the stars to add to this quilt? Or am I misasing something? I just love the look of this quilt and your stitching is really fancy! I love it! Thanks for sharing your designs!